
Learn how to manage purchase order entry, review, receipt, returns and requisition, as well as how to factor in landed costs with purchase orders.
Transcription
0:06 – 0:18 We are now looking at the purchase order entry screen. After selecting the vendor from what you want to order a product, predefined information about the vendor and order is populated as a starting point.
0:19 – 0:38 This information can be changed as required and include details about the vendor, which of our locations we want the order delivered to, as well as the price to populate the purchase order with via the vendors specified price or the last price which we paid on a purchase. Moving on to the order details tab.
0:39 – 0:52 The order details tab is where products are added to the purchase order. Products can be added by entering a product code, scrolling through the drop-down menu and choosing the desired product or using the inventory look up tool.
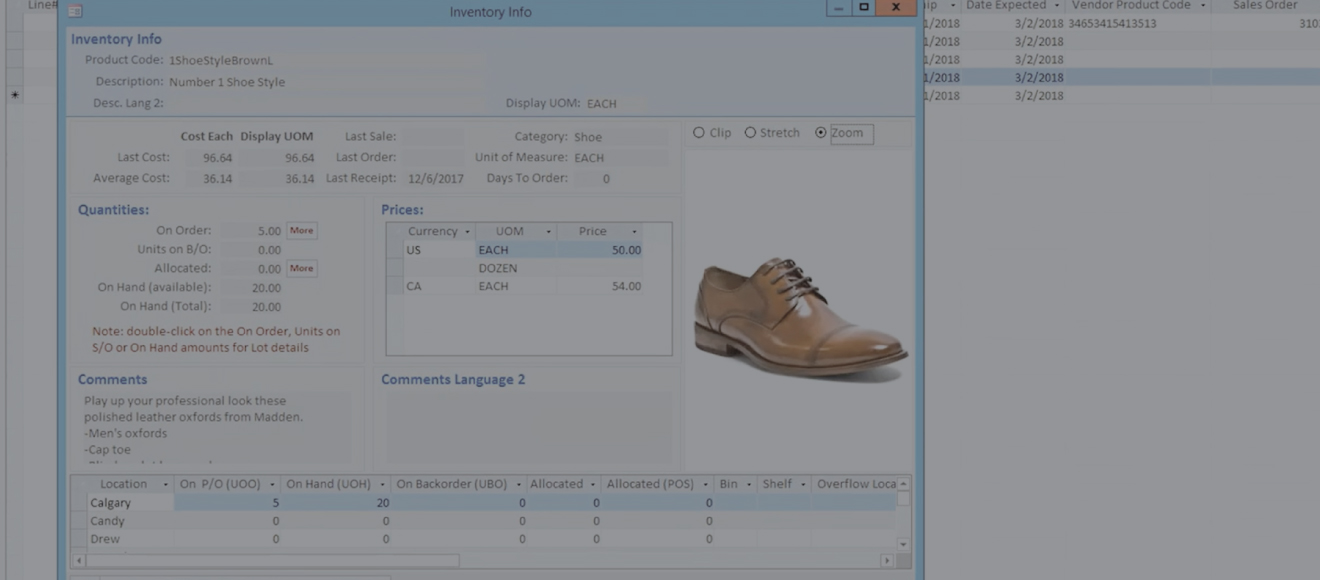
0:53 – 1:15 As products are added, the pricing field populates based it on the unit of measure chosen and the method indicated on the previous screen. The more on inventory feature can be used to see additional information about the highlighted product such as cost, availability, information, selling prices, as well as a picture of the product.
1:18 – 1:51 Purchases of goods often incur additional costs, such as freight, and if importing the product duties and brokerage fees. Blue Link’s landed cost functionality allows for these costs to be added to the cost of goods based on the landed cost factors, which are predefined in inventory control. Landed costs are calculated on a product by product basis and are allocated between the quantities of product based on the selected method such as extended dollar amount, quantity, weight, Or cube.
1:52 – 2:19 Once the purchase order has been finalized, It can be printed and/or emailed directly to the appropriate contact at the supplier, either through manual methods or based on automated routines. Well, we’ve just looked at manual purchase order creations from the purchase order entry screen, purchase orders may also be generated through automated processes directly from sales orders, and the inventory reorder screen as seen in their respective product tours.
2:20 – 2:37 Additionally, purchase orders can also be created automatically from a purchase order requisition screen. The purchase order requisition feature allows users without the appropriate level permission to approve purchase orders to add the products which they believe require ordering to a requisition list.
2:38 – 3:07 This list can then be submitted for approval to the appropriate staff. Once a purchase order requisition has been submitted for approval, it can be seen on the purchase order requisition review screen. This screen would be used by individuals with appropriate permission levels to see which purchase order requisitions require approval. From this screen the appropriate individual is able to select the appropriate requisition to then take actions with.
3:08 – 3:33 Once the authorized individual is back into the purchase order requisition, they’re able to approve the quantities as they seem fit. And then authorize the purchase order requisition. Once authorized, a purchase order can be automatically generated on the create purchase order tab, based on the quantities authorized previously.
3:34 – 3:55 The purchase order Review screen allows the user to view all outstanding purchase orders and details about them, such as the vendor, which location it’s going to, expected arrival date, vendor confirmation details, etc, as well as the details of the products on the order. Specific purchase order can be opened by clicking on the purchase order number.
3:56 – 4:11 When a shipment of good arrives, they receive purchase order screen is used to bring the inventory into the system. Once the physical inventory has been counted, the actual not received is entered onto this screen to compare to the purchase order.
4:12 – 4:27 At this point, any updated information regarding landing costs, such as actual shipping costs, are known differences to the duties and brokerage fees can be entered into the accrual screen, as seen earlier by accessing the button at the bottom of this page.
4:28 – 4:57 If the supplier invoice is available when the goods are received, A three way match can be done on the spot and invoice details can be entered in the lower section of this screen. Entering this information will create the payables entry once posted and the items will be added into inventory. If the supplier invoices not available at the time the goods are received, processing this receipt will add the items into inventory and create accrued payables both for the actual goods received and for the landed cost factors.
4:58 – 5:20 A three-way match can then be done once the invoices are received directly in Blue Links AP Voucher screen. Blue Links purchase order return screen allows you to easily manage products being returned to suppliers. Predicting returns may be added manually to the purchase order return screen or imported from a specific purchase order receipt.
5:21 – 5:40 For each product being returned, information such as quantity returned, price per unit, any restocking fees if applicable, reasons for return can easily be added. Once the returns processed, the quantities are removed from inventory and accounts payable is updated to reflect the effect of the return.
Blue Link ERP covers the entire process, starting with entering vendor and order information, and adding products through manual or automated methods. The video highlights the use of landed cost functionality, which includes additional shipping, duties, and brokerage fees that can be incorporated into product costs. The video also explores the requisition system, purchase order review, and how goods are processed upon arrival, with real-time updates on inventory, invoices, and returns. Learn how Blue Link ERP enhances efficiency and accuracy throughout the purchasing workflow.
Blue Link ERP provides integrated Accounting Software and Inventory Management Software to small and medium sized businesses, primarily wholesalers & distributors. READ MORE