
Learn how to record a vendor invoice in Blue Link ERP with a focus on basic invoices from suppliers to miscellaneous items such as office supplies and software or services.
Transcription
0:00 – 0:26 So let’s look at the basic accounts payable voucher entry. So, think of this as recording of vendor invoices, course 101. We’re going to deal with basic invoices from suppliers for miscellaneous things like office supplies or maybe software or services. And then there will be a separate training video once you’ve watched this one that you can watch on how to deal with invoices from product suppliers from whom you’ve received purchase order shipments.
0:27 – 0:48 In this tutorial, we’ll cover processing an invoice from a vendor that’s invoicing you in the same currency that you trade in. Will also deal with how that differs with an invoice in a foreign currency. And then we’ll just at the end deal with those few of you who might be using job costing and show you what the difference approach differences are in terms of the approach you’ll use. So, let’s get started.
0:49 – 1:16 So, let’s go ahead and open the accounts payable voucher screen. Now I’ll briefly Orient you on the screen. There are a few sections, the top left-hand areas where you start a new voucher by identifying the vendor, either by code or by name. If you have existing app vouchers that you’ve entered but you have not yet posted them, you can retrieve them and report them to the screen using the invoice number, the vendor code, or even who actually did the data entry. and then finish them that way.
1:17 – 1:38 You do your main entry about the basic invoice details in this section over here. This would be the invoice number, the due date, all that kind of stuff. You see some defaults from the vendor definition here, which you can override with this transaction if you need to. And then down at the bottom is where you do your distribution, you specify which expense accounts or asset accounts, whatever need to be affected in the general Ledger.
1:39 – 2:27 So, let’s go ahead and start this by identifying who the supplier is. We’re going to choose the supplier called Landlord Inc. Now the next sequential AP voucher number defaults the invoice number, but you should replace that with the actual invoice number on the supplier’s invoice. And then what you’ll do is you’ll make sure that you’ve got the correct invoice date and the due date will default based on these terms but may be overridden if there are any sales tax implications, you would be able to specify them in this area, but we’re going to assume that there aren’t for this case. And what we’re going to do is we’re going to enter the invoice; we’re going to say that this is an invoice that was $524. And what we’re gonna do is we’re gonna put in the description, we’re going to override the default description of AP voucher. We’re going to say it’s going to be repairs and maintenance.
2:28 – 3:00 Now we can put it in a detailed note in this area and it called transpose all the way through into the general Ledger. But we’re not gonna do that for now. So what we’re gonna do is we’re gonna jump down into the bottom section in order to allocate this. Now you can select the account or accounts that you’re applying this to using the account numbers, but you also have the ability to do it by account name and the interesting thing about doing my account name is that as you start typing, it’ll be a wild card match. So, as I type in REP, anything that has REP anywhere in it is included here.
3:01 – 3:18 So what I’m going to do is I’m going to select that first repairs and maintenance account for that department and I’m going to allocate, now you’ll notice it defaults to be the full amount, but I’m going to allocate, let’s say $400, and then I’m going to allocate the remainder to the other repairs and maintenance account.
3:19 – 3:58 So I’m going to say that this other account gets the balance and then once you finish doing this data entry, you will know that you have completed your work because it will balance. What that means is the amount that you’ve entered here, 524 agrees with the total that you’ve distributed down here and that is summarized over here. So as long as the amount to balance is zero, it means that was the amount of the invoice, that’s how much you’ve distributed this is the total of these detail items. You’re now good to go. So what you can do right now is simply go ahead and click on the process transaction button in order to post this invoice. And we’re done.
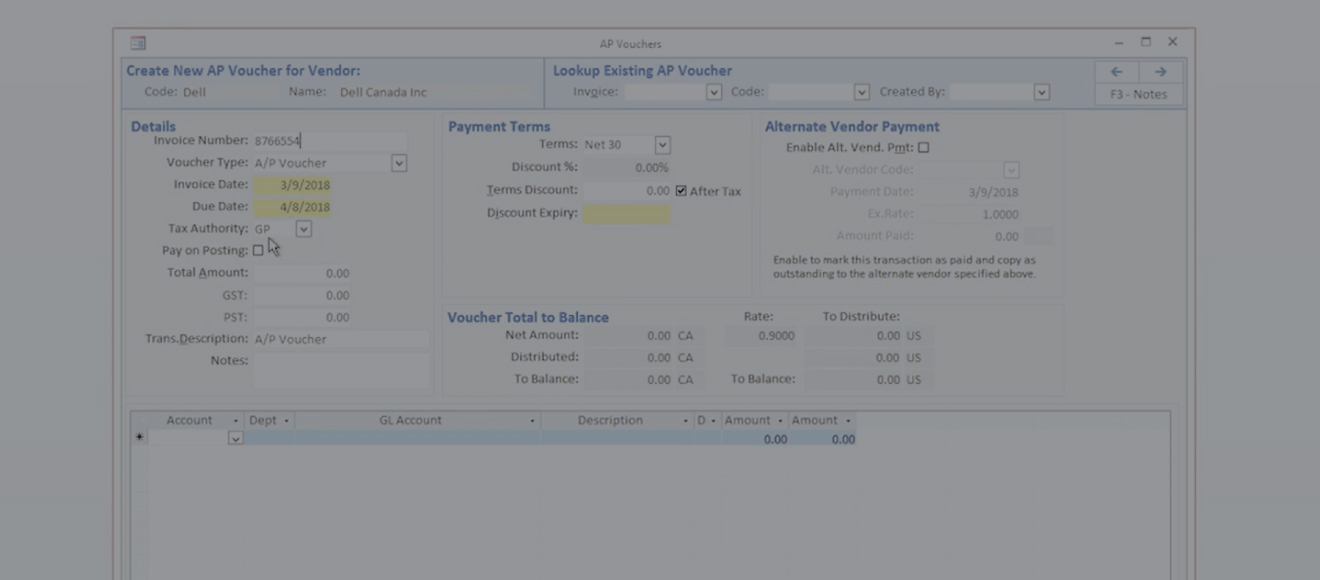
3:59 – 4:20 Now let’s look what happens when we process an invoice that is in a different currency to the currency in which we’re maintaining our books. So, these books are in U.S. dollars and are now going to process an invoice from a supplier. It will be Dell Canada and therefore it’s going to be in Canadian dollars. So once again, we’ll plug in the appropriate supplier’s invoice number.
4:21 – 4:46 But you’ll notice that there is a difference here. And the difference is that we’re showing two sets of totals to balance. We’re showing the net amount of the invoice which we’re going to enter in Canadian dollars and it’s going to convert it to our local currency based on the current exchange rate we have in the currency file. And it’s going to do the same thing with the amounts distributed, we’re also gonna have two columns down at the bottom. We’ll just quickly work through that. We’ll leave the invoice dates and due dates the same.
4:47 – 5:19 You’ll also notice that this one, this particular vendor has been set-up with different tax authorities, and we are able to actually recapture some of the sales tax that we pay. So, we want to separately allocate those sales taxes on this invoice. So, we’re gonna say to this invoice comes in at $113 Canadian and we’re gonna say that the GST is $13 and there’s no PST whatever those taxes mean doesn’t really matter and we’re going to say that this was media, let’s just say and again we can put a little bit of a detail about what these are we are going to.
5:19 – 5:41 What you’ll see again is we need to distribute or account for down at the bottom either 100 Canadian dollars or 90 U.S. dollars. And how we do that depends on what information we have of the supplier’s invoice. But the point is we we’ve got the ability to do it either way. So we’re going to go ahead in the bottom here and we’re going to allocate it and once again we’ll distribute this over two or three different lines.
5:42 – 6:02 Let’s go ahead and let’s start typing into the General Ledger account description. And we’re going to take the computer software expense and we’re going to say that the majority of this and we happen to know this is in Canadian dollars, let’s just say. So the majority of this is going to be, let’s say $75 is going to be computer software.
6:03 – 6:53 Now if we had done the math on breaking this invoice down in our local currency in U.S. dollars, we could in fact rather into the amount here in U.S. dollars and it would backward translate into Canadian dollars. Now let’s go ahead on this second line and we’ll once again plug in computer and this time we’re going to put it into the computer software asset account. So I’m gonna put the difference there. And again, you know it’s gonna tell us what it’s gonna give us the remaining balance and we can go ahead and accept that or we could go and override these numbers. But either way, you’ll notice that once we’ve accounted correctly for these numbers, once again in the top section, we’ve got zero left in to balance columns. So the key thing here is to realize that when you process an accounts payable voucher in a foreign currency, you have the ability to calculate the distributions and allocate them in either of the two currencies, but either way you obviously have to balance before you can post the transaction. 6:54 -7:10 Now, if you do not use job costing then you can stop watching this video here because the only thing going to cover now is if you do use job costing. If you’re a company that does use job costing and you code your suppliers invoices against specific jobs and cost codes, then here’s the quick variation on how you do that.
7:11 – 7:56 I’m gonna quote up an existing voucher that I’ve created for $1,225 and you’ll notice we now have these additional columns visible here. We have job code, cost code, and category and what we would typically do, although you don’t have to do in this sequence, but this is the typical way you would do is you would have identified what the job is and what your job cost or your job code structure is for this particular expense and again you can distribute this over multiple lines, but we might say this first one is for that job number, the cost code is going to be and these are user defined. So, yours may very possibly look different than mine, but I’ll say it’s product and then is it for labor materials, I’m going to say it’s for materials and you’ll notice it defaults the General Ledger account that’s been associated with that combination of cost codes and categories.
7:57 – 8:16 And then I can just go ahead and plug in the amount and again, I’ll do some of the things I did before. I’ll make this $1000 and then you can associate the next line with a different job or with the same job in a different cost code, whichever is appropriate for you. We’ll make it a different job, we’ll make it a different cost code as well, and we’ll even make it a different subcontract.
8:17 – 8:30 And again, same thing if it defaults to different generator account. From here you can go ahead and post the transaction and obviously as well as your General Ledger, your job costing will be updated and that’s really all there is to it.
Efficiently managing vendor invoices is crucial to maintaining your business’s financial health. With Blue Link ERP you can input key invoice details, from vendor identification to due dates, handle complex scenarios like foreign currency invoices and tax allocations and streamline job costing my assigning expenses to specific jobs and more!
Accurate and efficient invoice management saves time, reduces errors, and ensures compliance, so your team can focus on what matters most. Watch the video now and take the first step towards streamlined accounts payable processes!
Blue Link ERP provides integrated Accounting Software and Inventory Management Software to small and medium sized businesses, primarily wholesalers & distributors. READ MORE